
Let's look at video:

To switch on the e-meter - press the button on the e-meter and keep it pressed 1-2 seconds. Green led start to flash slowly. The e-meter attempts to connect to a Wi-Fi router with the data recorded in its settings. Once the connection is established, the green led will stop flashing and the program begins to display the data from the e-meter. iPad 3 at the video was already connected to the same router and the settings of program was set up at work with Wi-Fi.
What happens if the router is not installed (missing or switched off)? After a couple of minutes, the green led flashes quickly, and after a minute Theta-Meter will switches off.
To configure Theta-Meter Wi-Fi Pro to work with a specific router, connect it to the computer with Windows on USB, press the button on the device, keeping it 1-2 seconds until green led lights up. Launch the program snet.exe.
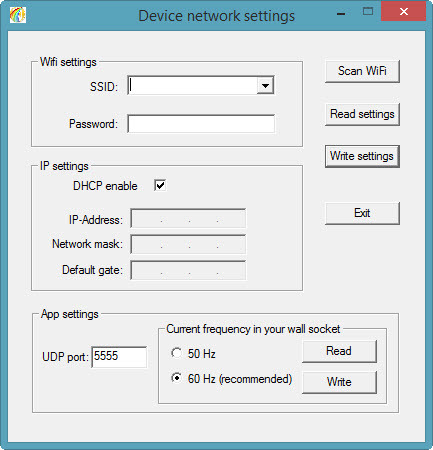
Click on the Scan button Wi-Fi. In window SSID displays all the networks that device can determine at the moment. Select the one you want to connect, enter the password in the Password field and click Write Settings. Device is ready for work.
Disconnect the meter from the USB port. Press the button, hold 1-2 seconds before up to start flashing green led. Device is connected!
Forgot to say what for is the red led. When there is charging, it is red. Charging takes about 6 hours to charge, device works up to 12 hours of continuous work. After charging red led stops to lit.
Mikhail Fedorov